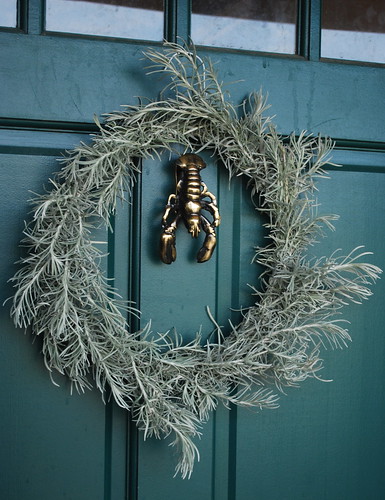
My curry plant (which looks like rosemary but smells like curry) was getting out of control so I used the cuttings to make a wreath with a wire coat hanger and some floral wire.

Tuesday, November 27, 2012
Tuesday, September 25, 2012
Baby Pumpkins
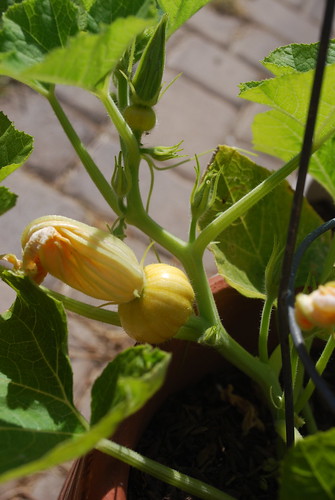
I've had quite a few volunteer squash plants pop up in the garden this year. Most of them turned out to be butternut squash, but it looks like this one, that is growing in a pot underneath a tomato plant, is a baby pumpkin. I did have one decorative baby pumpkin last fall that I ended up tossing in the compost after it started to rot. I guess this is one of its progeny.
Monday, August 20, 2012
Stinky Succulent Flower
I've had this Stapelia gigantea succulent for I think at least five years. I grew it from a small pinched off cutting and it has, very slowly, grown into this still not super giant plant. I have been hoping it would flower at some point because they are supposed to have really gorgeous starfish-like flowers. Last year it produced a small flower bud, but it ended up shriveling up and falling off. Earlier this summer, I was pleasantly surprised by this huge bud.


After a lot of waiting, this weekend it finally started to open.

And yesterday it opened completely. The plant is sometimes called carrion flower and is rumored to smell like dog poop. I believe it's primary pollinators are flies (you can see one on the picture below) who seem to enjoy the smell of those kinds of things. This one definitely smells a little off, but not in a disgusting way. I think it smells a little like bonito flakes or maybe kimchi.

Anyway, I wanted to document the flower, since it is already starting to wilt and I don't know how many years it will be before the plant produces another one.
Thursday, August 9, 2012
Hops Harvest

Supposedly, in the first year, you shouldn't expect to get any cones. So I was pleasantly surprised when the Nugget bine started to produce burrs.

Which eventually turned into really big cones.

It was hard to figure out when exactly I should harvest them, so I ended up just harvesting a few of the drier and more hoppy smelling ones and leaving on some of the wetter greener ones to harvest later.

It isn't too big of a harvest, but there are at least this many still left on the plant for a later harvest. The Cascade bine also has a few cones on it, but literally only 4 or 5 of them, so I'm not sure they will be worth harvesting.

I'm drying them in the garage on top of an old screen door with mesh fabric covering them so they don't fly away. Once they are dry I'll put them in the freezer. Nate should be able to use them for at least one batch of home brew. And next year, we should hopefully get a bunch more cones and maybe the other varieties will start to do a little better.

Tuesday, July 31, 2012
Keita's First Camping Trip

We took Keita on her first camping trip this past weekend. It was also a trip to celebrate our second anniversary. We camped at Buckhorn Campground in the Angeles National Forrest. As we were driving up the Angeles Crest Highway the landscape was looking pretty dry and hot with just shrubs and yuccas, but once we got over about 5000 ft. it turned into mixed conifer forest with pines and incense cedars. The campground itself was even more lush looking, well comparatively lush. There were lots of wildflowers and currant and thimbleberry bushes.


We made shish kabobs for dinner the first night and hotdogs and beans the second night.

The second day we were there we stumbled across the trail to the summit of Mt. Waterman a 8038 ft. peak in the San Gabriels. It was about a 6 mile round trip hike from our campground. We've actually skied at Mt. Waterman a good number of times so it was interesting to see the area in the summer without any snow.


Keita was a little barky and territorial of our campsite and probably would have rather been sleeping on our couch in font of the TV, but I think overall she had a good time.
Tuesday, June 26, 2012
In The Garden June 2012
Since I get to work from home, I tend to go out and check on the garden multiple times a day. So its king of hard to see much change between visits. I was out of town all last week for work and so I got to come home to more noticeable progress.

The first tomatoes are starting to get ripe. These are Black Krim which actually grew as volunteers from our compost. I made gazpacho last year from the Black Krim tomatoes that I grew in the garden and accidentally threw all the tomato seeds in the compost instead of down the garbage disposal. Since then they have been popping up all over the garden. This weird tomato developed from a monster fused tomato flower which I guess is kind of common on brandywine type heirloom tomato plants.

The tassels are starting to emerge on the corn in the three sisters planter box behind the barn. I can only see one ear forming. Hopefully the ears will catch up with the tassels soon.

I think we will end up with a bumper butternut squash harvest. The little baby butternut squashes are so cute.

The purple tomatillos are growing like crazy. I have never grown them before and never really cooked with them either. I will be making a whole lot of salsa verde. But, I think I'm going to have to look up some more things to do with them also.
Thursday, June 7, 2012
Hexagonal

After a long period of fear and procrastination, we finally tiled our bathroom floor. As you may remember, when we bought the house, the bathroom had decent looking grey and white tile in the tub surround, counter and backsplash, but the floor was just sheet vinyl (as shown below). It actually wasn't too ugly for sheet vinyl and vaguely resembled white tiles with grey grout. But, it still needed to go.

I have always loved hex tiles, especially on bathroom floors. I know they aren't that practical, since there is an awful lot of grout to get stained or cracked. But we figured that with dark grey grout, stains shouldn't show up nearly as easily as with white grout.
The whole process ended up being pretty involved and taking two weekends. First we took off the base boards, ripped up the vinyl and took off the toilet. In a house with only one bathroom, having to take off the toilet is a pretty major deal. Underneath the vinyl was just plywood subfloor which apparently is too flexible for tile. So we cut and thin-setted down cement backer board. After that was dry and we could walk on it we put the toilet back on. The tile we ordered from Lowe's still hadn't come in yet and we weren't going to go all week without a toilet.
Once the tile finally came in we took the toilet off again and started dry fitting and cutting the tile. Cutting 1" hex tile on a mesh backing is not an easy thing to do. We tried cutting it with a wet saw borrowed from a friend at first, but the water disintegrated the glue on the mesh backing and all the tiles started falling off. We ended getting this kind of paper-cutter-like thing that we used to hand score the tiles and then crack them. Not super accurate on 1" tiles, but it worked well enough for us.

After dry fitting all the tiles and numbering each sheet, we layer them down with thin-set.

Here they are all thin-stetted down.

The next day was grouting, then buffing, putting the toilet back on, and more buffing.
All in all I think it turned out pretty ok for our first ever tiling experience. Definitely not perfect, but good enough to live with.

We still need to put the baseboards back on. That should hide some of the roughness around the edges.

I think it made us more confident in the possibility of tiling the kitchen floor and backsplash at some point and I think it saved us a good chunk of change.
Subscribe to:
Posts (Atom)